"You don't strike me as the Martha Stewart type"

I am a Craft Instructor for Michael's, but first and foremost a Mom. This blog is going to cover the projects that go on in my studio, classroom, and kitchen. I am constantly learning new techniques and love to share them with my friends and family. I am primarily a paper crafter, but there will also be features on children's crafts, baking and other recipes, and doll and miniature crafting. There's no right or wrong in arts and crafts. Just relax and have fun!


Monday, February 27, 2012

Give me a little SMOOCH

I apologize about the brief posting hiatus.  When I sat down a few days ago at my computer I had almost finished the entry I was working on.  Of course, that’s when my usually reliable ISP went on the fritz.  I logged back on my PC the next day to find that my almost completed entry was *gasp* gone!  I had a major college flashback to losing hours of work on a paper or project by forgetting to click that little save icon like a maniac every time you pause in your work.  I stopped, took a breath, and remembered that it was all just arts and crafts.  
But, alas, I have kind of lost my train of thought on that original post now, so my intended entry on Journaling Tips is just going to have to wait.  Plus I discovered some new pretty shinies to share with you all.  For the month of February my crop event was sponsored by SMOOCH ink.  These inks are acid free and come in darling little bottles that could easily be mistaken for nail polish.  Smooch is a great name for a product line of inks because that’s really just what ink can be to a scrapper, a little kiss of color on a page.    
Instead of a brush tip on the lid like a nail polish, there is a stiff foam applicator that comes to a fine point perfect for swirl embellishments, edge inking, and dot bordering.  In addition to paper, they can be applied directly to rubber stamps, or even to spice up plain brads and metal embellishments. 

Here is an example embellishment I made using an acrylic stamp carefully colored in purple and green smooch ink.  After stamping the golden yellow ink was applied in empty spaces within the stamped image.  I then inked the edges of the cardstock with the purple ink by simply running the applicator along the very side of the paper.  This simple addition of an inked edge to a white or other light colored image can really make it pop.  It can act as a visual border when you do not have room for a double matted page component.
The next SMOOCH products I were able to play with were the SMOOCH spritz inks.  The kit I had included four colors, Silver Foil, Cherry Ice, Electric Blue, and Vanilla Shimmer.  
These are acid free liquid inks with shimmery particles suspended in them.  Their application is super easy, but super messy.  Basically you just lay your item to be inked down and spray away.  They are fast drying and fume free.  However, you must do this on a covered surface, or even better in the official “Color Catcher,” or you will be an inky mess.  Thought you could be careful and you tried it on your kitchen table anyway and need a quick clean up?  Try a Lysol wipe instead of just a wet paper towel.  It really cleans the ink up instead of just smearing it around your work surface.    
Not to hype it up, really, but the color catcher is just a card board box that’s missing a side. 
It can’t even accommodate a full 12”x12” piece of card stock.  It did work well with the 8”x8” cardstock I tested the spritzes out on.  My first few sprays were pretty splattery, so I recommend playing around with some scrap paper before you spray away at your project. 
This is a background I created by spraying each of the four colors I had in each corner of a sheet of white cardstock and working outward from there, overlapping in the middle to create a marbled effect on the paper.

This background was created by covering a sheet of black cardstock in Cherry Ice colored SMOOCH spritz and then brushing in even, one directional strokes across the page with a small dry foam brush.  Many unique background patterns can be created on cardstock for scrapbook pages, or on a blank greeting card, or even on blank chip board pieces. 
This bird was created by spritzing three layers of Electric Blue spritz on a pre-cut chipboard piece with about five minutes of dry time in between.  I really went to town with the amount of ink I applied here.  This was more than a little smooch, it was a full on make out session.  The color was darker, but still iridescent in the light due to the shimmer in the ink.  Because I like my canaries spotted, I added the regular SMOOCH ink in a lighter contrasting color, yellow, by simply dotting the applicator on the edge to create a cute border.  How trendy looking is he?  What's a good way to spice up any craft project? 

Thursday, February 16, 2012

C.R.O.P. Can't Resist Original Papercrafts?

I just finished up a new poster for the classroom at the store and I wanted to share it with you all!  It features hole punched polka dot letters, a glitter spotted chipboard yellow canary, as well as glittering and punch around the page techniques.   


I am super excited about the spring classes that we have coming up and can’t wait to share the excitement with our crafting students!  March Spotted Canary School scrapbook classes will be Fridays from 6-8 and Sundays from 2-4.  They last all four weeks and the cost is $25.00 for the month.   This is a great course for beginners, but is certainly appropriate for any level of scrappers.  My next one day event coming up is another fun monthly crop event.  I have some great giveaways and new products to show off at this one!  Here are the flyer details:

Can’t
Resist
Original
Papercrafts?

Me neither!  Come crop with me!

Michael’s of Johnson City will be hosting our next Crop Event

SUNDAY FEBRUARY 26th 1-6 p.m.

Enjoy an afternoon of scrapping with Certified Craft Instructor Brandi.  Any level of crafter is welcome.  You might even win a door prize!   The fee is only $5.  Reserve your spot with us early as space is limited! 
The Spotted Canary.  Isn't he cute?
Paper not your thing?  I’m not offended!  Try beading or knitting or cake decorating.  Want to take a class with me or another one of our wonderful craft instructors?  Leave me a comment or send me a message and I can help you sign up!

Tuesday, February 14, 2012

Glitter – Not just for Fairies and Vampires!

We got some wonderful new card making kits by Martha Stewart in at the store.  I am super excited about them because they will be accompanied by two new one day classes I will be teaching this spring.  Later this spring I will be featuring the punch around the page systems in an advanced punch techniques class.  Coming up first I have a sparkling way to add emphasis to a project with glittering!  I have been really having a blast learning the new tools and techniques that have been developed to give your project that perfect pizazz. 

Glitter gets a bad rap.  It’s often the butt of craft jokes, the key to Edward’s sparkle or the evidence of a visit from Tinker Bell.  It can be the mark of a school poster gone wrong.  To a lot of scrappers and card makers, glitter can be the perfect touch.  A little can highlight a certain element or embellishment; a lot can provide a big impact.  I have really been amazed at the variety of glitter textures available in my store.  There are lots available, from fine and super fine glitters to microbeads and my personal new obsession, tinsel glitter.  Decisions, decisions!

This is the Martha Stewart crafts studio glittering techniques kit:
It contains all the supplies you need to complete four glittered butterfly greeting card projects.  Today I am only walking you through the first one, and it’s adorable. 
The kit contains a total of five colors of super fine glitter, (peridot, tourmaline, onyx, orange sorbet, and Florentine gold) and one vial of tinsel glitter in turquoise (my personal favorite!).  This is more than enough glitter to complete the projects included with glitter to spare.  Here are the additional materials included to complete the first card:
  • A blank cardstock greeting card in olive green.
  • A piece of blue vine patterned decorative paper, pre-cut to fit the greeting card.
  • A blank chip board butterfly.
  • A pre-printed “thank you” light blue cardstock piece.
  • Foam dot adhesive.
  • A small tube of white glue.
  • A foam craft paint brush.
From my own supplies I also used:
  • A sheet of plain white printer paper to catch and refill glitter.
  • Recollections brand adhesive glue dots in size large.
  • A Martha Stewart fine-tip glue pen.  This is my favorite new tool to help achieve glittered borders and glittered handwriting. 
First we will need to glitter our butterfly so it has a minute to dry while we assemble the card.  Apply a thin coat of the white glue to the chip board butterfly’s wings only.  Do NOT paint the body and antennae or you will mess up the finished look.  Set the butterfly down on the printer paper and sprinkle away with the peridot glitter.  Really lay it on there good.  Don’t worry about hitting the body with the dry glitter, it will only stick where there is adhesive.  Once you have the wings good and covered hold the butterfly up and gently tap the back to get the excess glitter to shake off.  Reload the excess glitter you catch on your printer paper back into the glitter vial.  Let your butterfly dry a couple minutes. 
Next, using a glue pen (or the white glue with a fine nozzle), apply the adhesive to the body of the butterfly.  The glue pen is wonderful for fine lines and tight spaces.  Simple depress the pen nib a few times to get the glue flowing then write away like a regular marker.  The glue applies blue but dries clear.  Using the same shake on, tap off method, apply the turquoise tinsel glitter to the body of the butterfly. 
The final glittered embellishment for the front of this card is the simple journaled message “Thank You.” It is hand written with the glue pen, then glittered with the peridot green fine glitter.  A handwritten message can look pretty spiffy when all glammed up.
Now we are ready to assemble our card.  Mount the printed paper onto the card using the glue dots, or a glue stick or tape runner if you prefer.
I added this glitter border with a super simple technique.  I traced the outline of the edge where the decorative paper meets the card with the fine tip glue pen.  Then I applied tinsel glitter and shook off the excess.  Voila!  A thin glittered border!
Using a few foam dots to give it an extra 3-D pop, attach the butterfly and the glittered message.
That’s it.  Another project big on impact but short on time spent!  Glittering is really a blast.  I hope you all give it a try and feel nostalgic about making grown up projects with this fairy and vampire approved material.   

Thursday, February 09, 2012

Super Bowl Snacks Part 2 - What's for Dessert?

Cake of course!  
A lot of my baking process can be read in the beer cake post.  If you are really interested you can go back and see my basic process there.  I bought a Wilton football cake mold several months ago, but hadn’t had a reason to use it until now.  Basically the Super Bowl is THE most appropriate time for football shaped cakes.  I knew if I didn’t use that sucker now it was going to be collecting dust for a while.  Nobody makes cakes to celebrate training camp. 

Here is my football cake mold.  When using shaped pans it is IMPERATIVE that you prep your pan.  Get all up in those nooks and crannies with your cake release goo (or shortening and flour if you must).  It really will ensure a prettier cake in the end.

Since footballs are brown I went with a death by chocolate theme.  The ingredients are the same as the beer cake, only using chocolate cake mix and chocolate pudding.

Again, they are as follows:

A box of cake mix.  I use Duncan Hines.
A box of Instant Jell-O Pudding
1 cup of sour cream
4 eggs
½ cup vegetable oil
½ cup water

I bake at a lower temperature for a longer time.  This cake was baked at 325 for about an hour.  It was cooled slightly and turned out onto my board for frosting.


I must admit I am not super crazy about the chocolate buttercream recipe I used for this cake, so I won’t be posting it.  It came out very, very rich.  It was tasty, but a little over the top.  If I do find one I AM crazy about in the future I will let you all know. 

The base of the cake was frosted in the chocolate buttercream and the details were regular white buttercream.  For the regular buttercream I used THIS RECIPE as always.  They were piped on with a piping bag equipped with Wilton’s #13 tip.  The side stripes are just three piped lines that I smoothed over with a spatula.  I did a simple dot border around the base.  Talk about a fast and easy decorating job!  Even with baking and cooling time this cake was a snap.  What a sweet ending to a sweet game!

Tuesday, February 07, 2012

Super Bowl Snacks Edition

Unlike a lot of Southern gals, I’m not a football fan by birth.  I merely married into the NFL nation.  I have found however, that I really do enjoy watching the games and keeping up with our team with my husband.  (Go Redskins!)  This year to celebrate the Super Bowl we went to watch the game with our good friends Bridgett and Scott.  Scott is a big time, blue-bleeding Giants Fan, so of course we were pulling for them to win. 

No Super Bowl gathering is complete without some snack foods, right?  Bridgett was an excellent hostess with a great spread of wings, BBQ, and other yumminess.  I decided to bring my favorite pot luck appetizer, Artichoke Bread.  I found the original recipe for this in a magazine that would come with my power bill when we lived in North Carolina called “Carolina Country.”  It was a real crowd pleaser for office parties when I worked at Cheap Joe’s Art Stuff.  It’s the perfect party food because the dip is baked in the bread, so you have an all in one bite!
Ingredients:

  • A loaf of French bread.
  • 1 ½ cups of Sour Cream. 
  • ½ cup of Butter, melted.
  • 2 Tablespoons Sesame Seeds.  These are with the spices on the baking aisle in your grocery store.
  • 3 cups of shredded cheese, this time I used Colby Jack.  Any combo of Cheddar, Monterrey Jack, or Colby would work well.
  • ½ cup Parmesan.  I get shredded because I am not a big fan of the powdery parm in the Green Shaker, but you could use that if you like.
  • 1 can of Artichoke Hearts, drained.
  • 4 Garlic cloves.
  • 2 Tablespoons parsley, freshly minced would be ideal, but I couldn’t find any, so I am using dried.
  • 2 Teaspoons of lemon pepper seasoning.
First prep your bread loaf by cutting it in half length wise like this:

 Then hollow it out to make two bread boats.  Save the bread innards.  I just use my (clean!) fingers to go in and pinch out pieces.  You end up with empty vessels for filling:
Your inside bread bits are probably crumbly already, but I run the bread crumbs through my food processor to make them even crumblier.  Then in a large mixing bowl combine the bread crumbs, sour cream, melted butter and sesame seeds.  Spread this mixture into a baking dish.
Before Broilin'
Broil it for about five minutes, the take it out and stir the brown bits on top down into the mixture.  Continue broiling it for another five minutes or so.  DO NOT walk away from the broiler.  Broiling is a funny thing.  It requires close supervision.  It can take your food from barely done to burnt to a crisp in a matter of minutes.  Your mixture should come out of the broiler looking like this:
After Broilin'
while I am broiling I am combining the can of artichoke hearts, garlic cloves, parsley and lemon pepper in my food processor.  I blend them all up and come out with a pleasantly green mixture:

Now you are ready to assemble your dip!  In the big mixing bowl combine the broiled bread crumb mixture, the green artichoke mixture and the cheeses.  Now spoon the dip back into hollowed out bread boats.  I cover mine with extra cheese, because well, that’s just how I roll.  You could also put some extra sesame seeds or parsley on top.
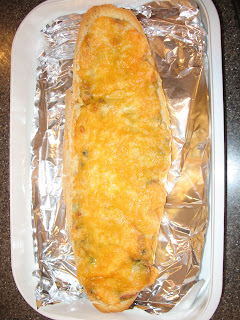
Bake your bread at 350 for about 20 minutes or so, until the cheese is a gooey, melty, and a little brown and the dip is hot throughout.  
Yuuuuuum!
Cut into slices and serve hot.  I usually carry my loaves whole and don’t do the slicing until party time, or let the guests do their own slicing.  It’s super yummy and leftovers reheat well.  ENJOY!