"You don't strike me as the Martha Stewart type"

I am a Craft Instructor for Michael's, but first and foremost a Mom. This blog is going to cover the projects that go on in my studio, classroom, and kitchen. I am constantly learning new techniques and love to share them with my friends and family. I am primarily a paper crafter, but there will also be features on children's crafts, baking and other recipes, and doll and miniature crafting. There's no right or wrong in arts and crafts. Just relax and have fun!


Showing posts with label store events. Show all posts

Thursday, March 29, 2012

Another Drink of Punch

Punch Around the Page – Corner Card Technique

Here’s a sneak preview of an upcoming demo for April 21st, and a special one day class on May 12th!  It’s Martha Stewarts Punch Techniques class featuring the oh-so-cool punch around the page technique.  It will really make people ask, “How did you do that to your paper?”  It’s complicated looking, but with a little practice yields great results easily, with just a few punches.  Here is a card featuring the full technique:
 
But sorry folks, I am not going to spill the beans on that card today.  To learn the full border technique and lots more, come see me at the store for the demo and sign up for class!  The card I am writing about today features a nifty corner punch detail.  This one’s all in the angle. 

What is punch around the page?  It’s a set of two coordinating punches, a corner punch and a border punch.  They have special markings on them that help in aligning them together.  They are designed to give a continuous punched look around a border.  Here is the class kit I am working out of. 

This kit does NOT include the punch around the page punches!  It simply has the materials to produce a total of six cards in four designs, as well as detail instructions.  Any Martha Stewart punch around the page set could be used.  I am using the “Loops” set.  Here are the materials to complete the card:
 
  • A blank green cardstock pre-folded card
  • Coordinating decorative paper and pink cardstocks pre-cut to fit
  • A pink “Thinking of you” phrase embellishment sticker
NOT included in the kit:

  • A glue stick (always, always, ALWAYS acid free)
  • The corner punch part of the punch around the page set  
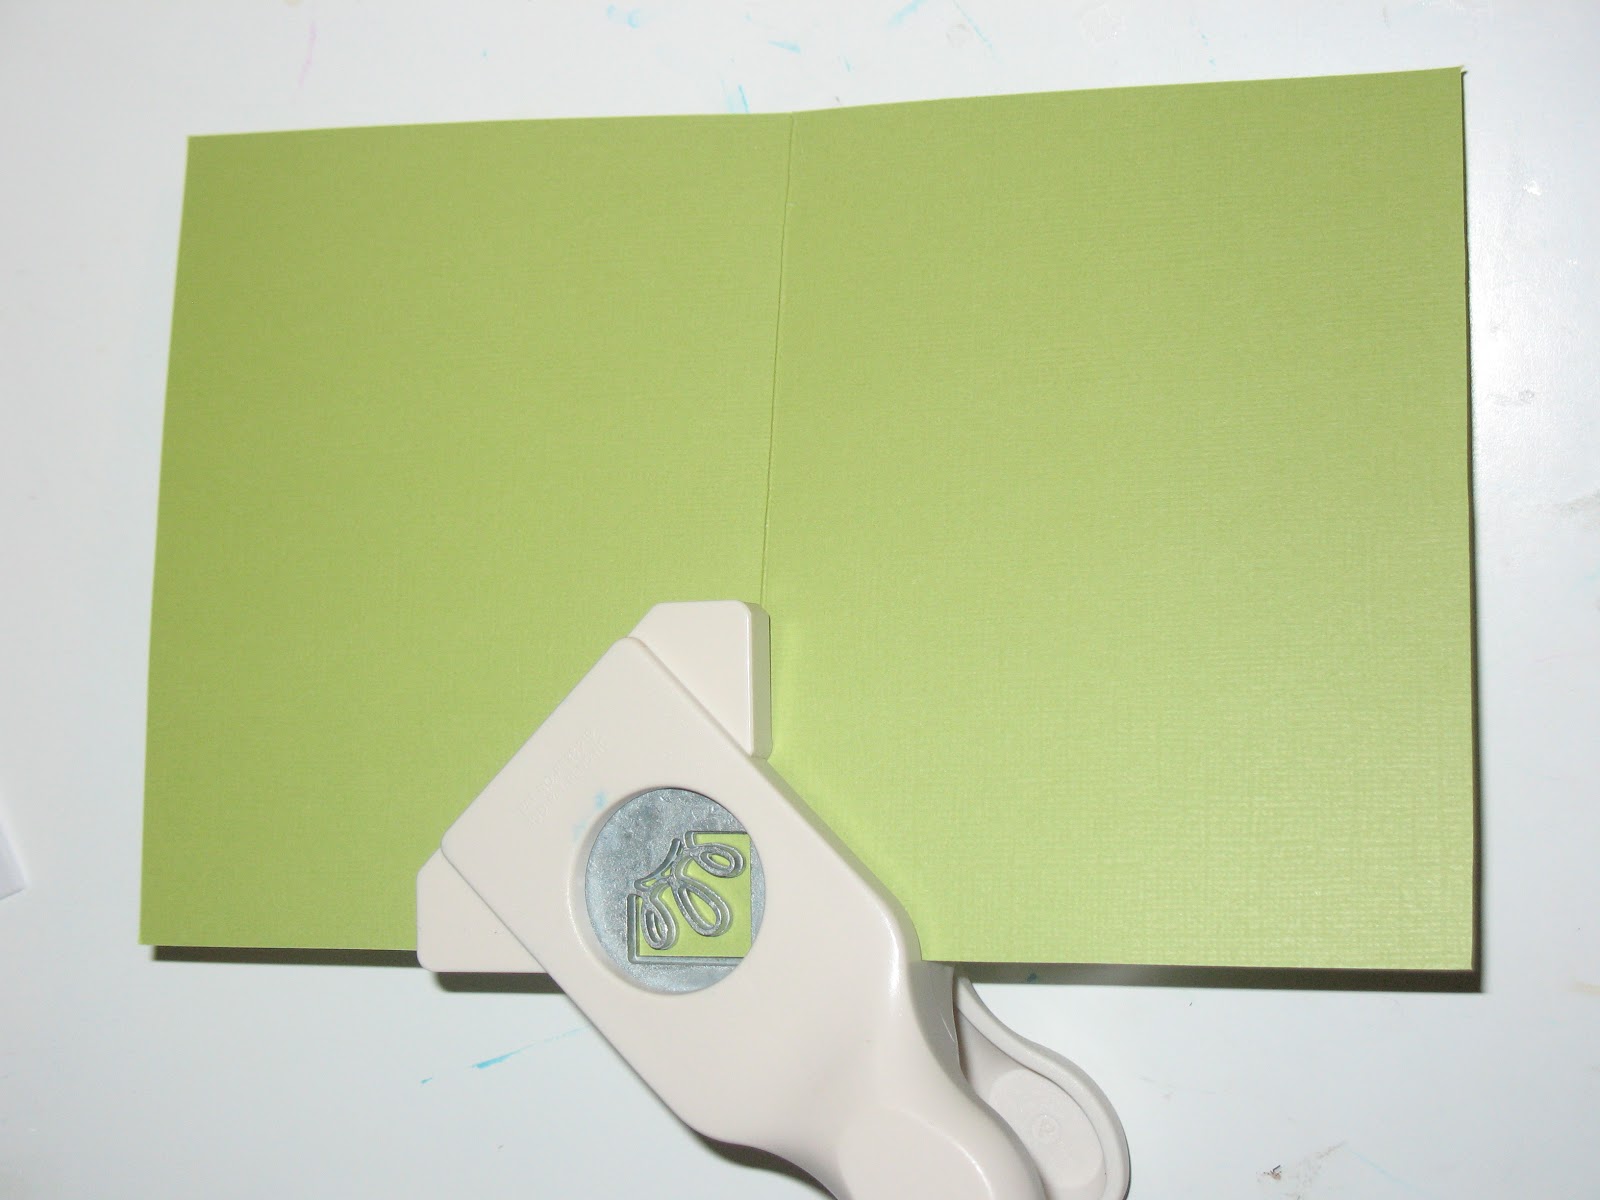
The first step is the trick that makes the look of this card unique.  Open the pre folded card and punch the top corners on the front of the card first.  Do this by holding the punch at an angle and aligning the fold of the card with the silver mark on the side of the punch.  Align the other side of the corner with the edge of the wing of the punch.  The alignment looks like this:

Whenever you punch, do it upside down.  This really allows you to see the positioning of the paper in the punch.  This will prevent any “oops, I thought I was punching right there” moments.  Repeat this step on the other top corner.

For the bottom corners simply punch just like a regular corner punch, aligning the paper corners with the popped out “wings” on the side that help guide the punch.

Next layer and adhere the light pink cardstock underneath the green card front.  This lets the contrasting color peak through the punched pieces on the card front corners.

Now the easy part, layer and adhere the darker pink cardstock strip to the center of the card front.  Then add the decorative paper to the center of your dark pink stripe. 

Now you’re ready to add the finishing touch!  Place the journaled embellishment in the center of the decorative paper.  You could use foam dots for this if you’d like to give it some extra dimension.
    

Easy, easy, easy, EASY!  Now reward yourself and go have a drink of punch, rum if you please.  ;)


Sunday, March 11, 2012

Glittering Part 2 - Think Tink.

This is another sneak peak of an easy peasy card that I will be teaching during a specialty class, “Martha Stewart Glittering Techniques.”  This class will be offered Sunday, April 15th from 2-4 p.m.  I have also just added a list of upcoming classes that I will be teaching to the side bar of this blog.  I will be keeping it updated regularly with my class info, for those of you who might like to come and craft with me in person.  (You should, it’s super fun!)
So here is the finished card.  I must say I LOVE the plaid border technique on this card.  It will definitely be showing up on projects in the future. 

I am again working out of the Martha Stewart Glittering Techniques Card kit.  The info on this kit is in my first post on glittering.  Here are my supplies:
  • Fine glitter in Orange Sherbet, and Tourmaline, a pretty pinky rose.
  • A chipboard butterfly.  This one’s pre-printed.
  • The glue tube included with the kit.
  • A peach cardstock pre folded blank card.
  • Double sided tape.  (This is the secret ingredient for perfect plaid.)
  • Foam adhesive spots, to make that butterfly pop.
  • A foam brush for spreading adhesive.
I used NO tools or supplies that were not included in the kit for this card, except for a plain piece of white printer paper to catch the glitter.
First I glittered the chipboard butterfly embellishment.  I did this first, so it would have a minute to dry.  After I set the butterfly on top of the printer paper, I squeezed a little glob of the glue from the tube onto the butterfly and the spread it with the foam brush until there was an even, thin coat.  Then I LIBERALLY applied the orange glitter.  Don’t be worried about using too much, you can’t.  Once you lift the butterfly and tap the back to release the excess onto the paper, just funnel the glitter back into the shaker using the paper. 

How pretty!  Set it aside for so it can dry.  Now for that awesome plaid corner border, it’s done in layers!  Working over the plain paper again, apply a strip of the double sided tap along the edge of the card, offset about a quarter of an inch from the edge.  Trim the ends flush.  Now rip off the second adhesive backing on the tape and apply the orange glitter to the line.  Tap off the excess and recapture it.  You end up with a perfectly striped glittered border.

The next layer is the pink horizontal stripe.  It’s double thick because it is two pieces of the double stick tape laid side by side.  Go ahead and lay it perpendicularly right over the orange border.  It won’t hurt it.  After you lay the two strips and remove the backing strip to expose the adhesive, glitter the line pink.  You can glitter right over the orange piece that intersects with the pink and they won’t mix, I promise.
Repeat the process again with the last orange line, offset about a quarter of an inch from the first orange glittered line.
Voila!  It looks complicated, but it’s so easy!  Now all you have to do is attach the chipboard butterfly that you glittered in the beginning using some foam adhesive pieces.  This is an impressive little card to put together in under 20 minutes. 
Don’t be afraid of glitter!  The mess factor can be intimidating, but a spill wipes up surprisingly easy.  Use wet wipes instead of a paper towel, and it just takes a second. 
Coming up next month is Easter, my daughter’s birthday, and my wedding anniversary.  Talk about a month full of crafty opportunities!  I can’t wait!                   

Tuesday, March 06, 2012

Roll one up! Making paper roses.

This past weekend at my store we had our open house event with all the instructors showing off thier crafty creations.  One of the classes I showcased was called FlowerWOW! It features this super easy flower making technique.  The variations and applications are basically endless.  Cut with decorative scissors to give a wavy edge.  Ink the edges of your petals for a dipped or faded look.  Distress the paper to look worn.  Add glue and glitter.  Cut out green paper leaves to accent.  Don’t be afraid to use pattered decorative papers, or use double sided paper for an even cooler look.
Here are the basic steps.   You probably have all the supplies needed to roll one right now!
  •  Scissors
  • A pencil
  • Adhesive – I actually use two different ones for this project, a glue stick and craft glue (I use Aleene’s Tacky Glue).  These both look white when applied but dry clear.    
  • A paper circle.  Obviously, the larger the circle the larger the flower.  I tried circles as large as 6 inches and as small as 2 ½ inches.  Pick any color or pattern you like!  I tried with both a lighter weight decorative paper and a medium weight cardstock, and got similar results with both. 
First, draw a spiral in your circle, like this:
Try to keep the width even throughout the spiral.  Then cut along the line you just drew.  If you are inking your edges go ahead and do so and let them dry for a couple minutes.
Start rolling the paper from the OUTSIDE end of the spiral.  Give it a couple practice rolls. 
Start the roll tight.  When you get to the end, if you want it tight keep your fingers held if you want you flower to be more open, release your fingers a bit and let the paper unroll some.  The inside of the spiral will look like a small flap.
Cover that with adhesive and press it to the base to seal the bottom of the flower.  I use the glue stick for this part.  Then I go back and reinforce the flower by slipping the tip of the tacky glue in between the petals and squeezing a little into the bottom center.  Then I press down the middle of the spiraled petals to adhere them.   
That’s it!  Now that you have a flower, make a couple more!
Now that you have a few flowers made, here are some ideas on what to do with them:  use one on a card or gift tag, mount them on a canvas painted in a contrasting color, make a dozen and attach them to stems and put them in a vase for a fun faux flower arrangement, make lots more and attach them with hot glue to a wreath.
Want to learn more fun, new techniques like this?  Come to my next Crop event.  It will be March 17, 2012 from 1-7 p.m.  As always the fee is only $5.00!!

Thursday, February 16, 2012

C.R.O.P. Can't Resist Original Papercrafts?

I just finished up a new poster for the classroom at the store and I wanted to share it with you all!  It features hole punched polka dot letters, a glitter spotted chipboard yellow canary, as well as glittering and punch around the page techniques.   


I am super excited about the spring classes that we have coming up and can’t wait to share the excitement with our crafting students!  March Spotted Canary School scrapbook classes will be Fridays from 6-8 and Sundays from 2-4.  They last all four weeks and the cost is $25.00 for the month.   This is a great course for beginners, but is certainly appropriate for any level of scrappers.  My next one day event coming up is another fun monthly crop event.  I have some great giveaways and new products to show off at this one!  Here are the flyer details:

Can’t
Resist
Original
Papercrafts?

Me neither!  Come crop with me!

Michael’s of Johnson City will be hosting our next Crop Event

SUNDAY FEBRUARY 26th 1-6 p.m.

Enjoy an afternoon of scrapping with Certified Craft Instructor Brandi.  Any level of crafter is welcome.  You might even win a door prize!   The fee is only $5.  Reserve your spot with us early as space is limited! 
The Spotted Canary.  Isn't he cute?
Paper not your thing?  I’m not offended!  Try beading or knitting or cake decorating.  Want to take a class with me or another one of our wonderful craft instructors?  Leave me a comment or send me a message and I can help you sign up!

Thursday, January 12, 2012

Crop It Out!

I have finally wrapped up my online classes with spotted canary school, and I am now an officially certified instructor with Scrapbook Design U.  In addition to the four week scrap booking basics class that I will be teaching at my store beginning in February, I also host demos, specialty one time technique classes, and crops.  Here is the flyer info for my next event:

Attention Tri-Cities Crafters!
We know you took a ton of photos this past year.
Come put them to good use at Michael’s 1st CROP NIGHT event of 2012!
1 p.m. – 7 p.m. on SATURDAY JANUARY 28th
At Michael’s of Johnson City - ONLY $5 to attend!
Come swap ideas, tools, and stories with Certified Instructor Brandi
Have fun and meet other local scrappers while learning new techniques.
Also ask about Scrapbook Design classes starting this February!
So, what is a crop?  Although not limited to women, I like to think of it as a special type of crafting hen party.  A funny thing about scrap booking is that although your main goal is to your share your photos and experiences with others, the actual act of putting your project together is mostly done solo.  I know as a busy mom, I am usually doing my crafting during that precious nap time, or even in the middle of the night when I just can't sleep (hey, it beats those dumb infomercials).  It's certainly not a very social activity at 3 a.m.  A crop event changes that game entirely. 

A crop is basically a social scrap booking session, a place where many crafters gather, under the guidance of a facilitator, and work on individual projects and layouts, together.  A crop is a great motivator to begin and finish layouts you may have been hesitant to complete on your own.  How many times have you thought "Does this embellishment look better blue or green?" or "Does that title look OK?"  At a crop you can get instant feedback from your peers.   

My favorite part about a crop event is the flow of ideas between scrappers.  You can come and inspire others while also being inspired by their work.  You can also share tools, papers, and techniques.  Most crop locations have cabinets of supplies that are accessible to the croppers.  Stepping outside of your personal collection of supplies will also increase the diverse look of your pages and projects.  

Above all, a crop event is FUN.  There is more than a little talking, giggling and story telling to go along with the crafting.   Who doesn't want to meet new, like minded crafters in their area?  This is the perfect place!  A crop is more than an event, it can be a valuable resource to a scrapper, a chance to share their experiences while being enriched with the knowledge and stories of others.

Are you convinced yet?  If so, come CROP IT OUT with me!   

NOW CROP IT OUT
NOW CROP IT OUT

WEST SIDE CROP IT OUT
SOUTH SIDE CROP IT OUT
EAST SIDE CROP IT OUT
NORTH SIDE CROP IT OUT