"You don't strike me as the Martha Stewart type"

I am a Craft Instructor for Michael's, but first and foremost a Mom. This blog is going to cover the projects that go on in my studio, classroom, and kitchen. I am constantly learning new techniques and love to share them with my friends and family. I am primarily a paper crafter, but there will also be features on children's crafts, baking and other recipes, and doll and miniature crafting. There's no right or wrong in arts and crafts. Just relax and have fun!


Thursday, March 29, 2012

Another Drink of Punch

Punch Around the Page – Corner Card Technique

Here’s a sneak preview of an upcoming demo for April 21st, and a special one day class on May 12th!  It’s Martha Stewarts Punch Techniques class featuring the oh-so-cool punch around the page technique.  It will really make people ask, “How did you do that to your paper?”  It’s complicated looking, but with a little practice yields great results easily, with just a few punches.  Here is a card featuring the full technique:
 
But sorry folks, I am not going to spill the beans on that card today.  To learn the full border technique and lots more, come see me at the store for the demo and sign up for class!  The card I am writing about today features a nifty corner punch detail.  This one’s all in the angle. 

What is punch around the page?  It’s a set of two coordinating punches, a corner punch and a border punch.  They have special markings on them that help in aligning them together.  They are designed to give a continuous punched look around a border.  Here is the class kit I am working out of. 

This kit does NOT include the punch around the page punches!  It simply has the materials to produce a total of six cards in four designs, as well as detail instructions.  Any Martha Stewart punch around the page set could be used.  I am using the “Loops” set.  Here are the materials to complete the card:
 
  • A blank green cardstock pre-folded card
  • Coordinating decorative paper and pink cardstocks pre-cut to fit
  • A pink “Thinking of you” phrase embellishment sticker
NOT included in the kit:

  • A glue stick (always, always, ALWAYS acid free)
  • The corner punch part of the punch around the page set  
The first step is the trick that makes the look of this card unique.  Open the pre folded card and punch the top corners on the front of the card first.  Do this by holding the punch at an angle and aligning the fold of the card with the silver mark on the side of the punch.  Align the other side of the corner with the edge of the wing of the punch.  The alignment looks like this:

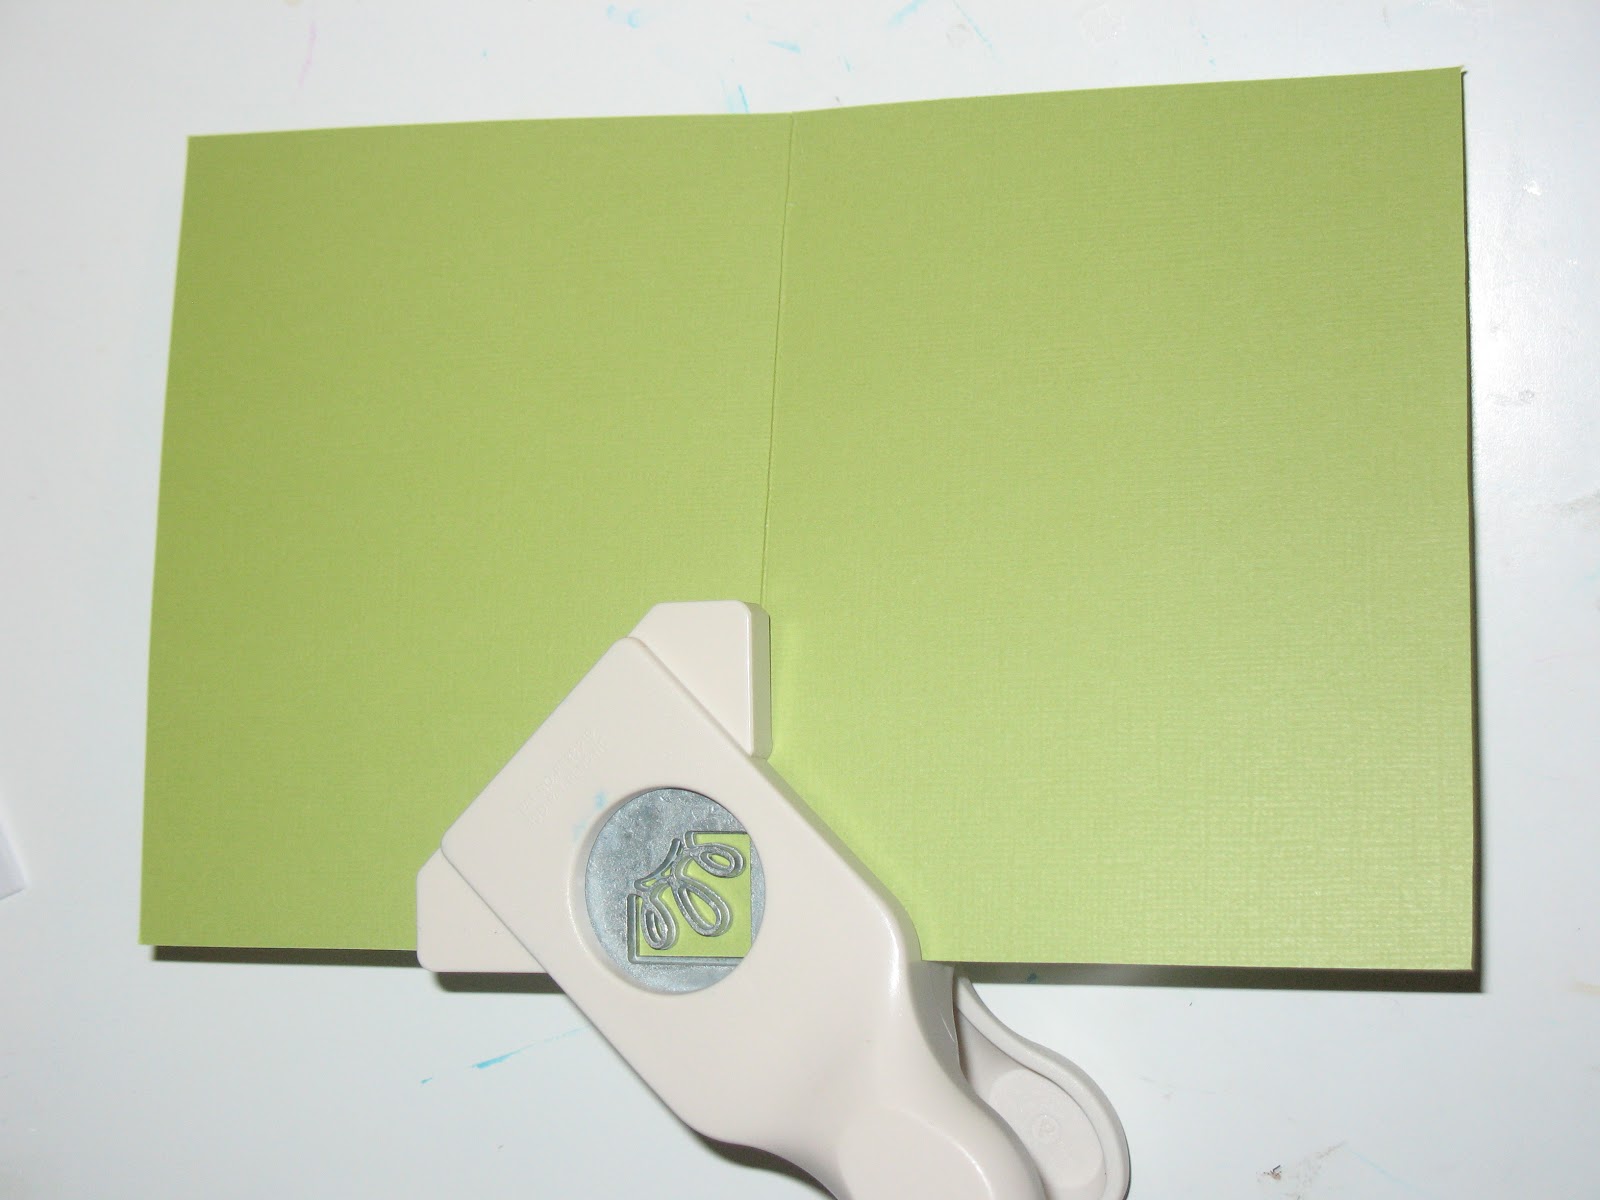
Whenever you punch, do it upside down.  This really allows you to see the positioning of the paper in the punch.  This will prevent any “oops, I thought I was punching right there” moments.  Repeat this step on the other top corner.

For the bottom corners simply punch just like a regular corner punch, aligning the paper corners with the popped out “wings” on the side that help guide the punch.

Next layer and adhere the light pink cardstock underneath the green card front.  This lets the contrasting color peak through the punched pieces on the card front corners.

Now the easy part, layer and adhere the darker pink cardstock strip to the center of the card front.  Then add the decorative paper to the center of your dark pink stripe. 

Now you’re ready to add the finishing touch!  Place the journaled embellishment in the center of the decorative paper.  You could use foam dots for this if you’d like to give it some extra dimension.
    

Easy, easy, easy, EASY!  Now reward yourself and go have a drink of punch, rum if you please.  ;)


Wednesday, March 21, 2012

I'm Gonna Punch You Out!

Paper trimmers, rubber stamps, adhesive runners, these are a few of the tools of the trade.  Just like any other tools, craft tools need to be maintained to function through years of use.  While having single use embellishments, like tags, brad or stickers can be nice stamps and punches are embellishment tools that can be used again and again, really giving you some bang for their buck.  Over the years I seem to be accumulating quite the collection of both.

I have noticed that a few of my well-loved punches just aren’t performing like they used to, especially some of my cheaper ones.  Maybe they don’t cut the paper as cleanly and leave torn places.  Maybe they don’t squeeze as easily as they once did, or freeze up mid punch.  Here are a couple tricks to give your punches some much needed lovin’.  The secret is in your kitchen.  Here’s what you need:
 
  • Old punches, any type, any size.
  • Wax paper
  • Aluminum foil
If your punch is sticking, or hard to compress, it may need some additional help.  Take your punch and punch the wax paper over and over.  Really go to town if you want to, the more the better.  The wax helps to lubricate the metal, making the punch action smoother.
 
If your punch tears a corner of your paper, or won’t cut card stock evenly, it may have a bur or an uneven place in the metal edging.  To help correct this punch through a sheet of aluminum foil over and over, this helps to file down any rough uneven places.
 
These two quick, simple fixes can help extend the life of your punch tools, helping you create awesome embellishments for years to come.

I am starting on a new Disney themed paper bag album for my daughter this week, so stay tuned for a fun tutorial on those!!  I love being inspired.  J

Friday, March 16, 2012

Berry Nice Party Invitations

  My daughter is nuts for Strawberry Shortcake.  She comes by it honestly; she was one of my favorite childhood characters also.  I am still nuts for strawberries, and LOVE to use them in my crafting and décor.  The invitations were made out of printable images available from Strawberry Shortcake’s website, and leftovers from around the craft room.

If your kid has a favorite character you should check out their website to find printable crafts, activities, and coloring pages featuring them.  Disney has great ones for almost all of their characters especially the one and only Mickey, and Nick Jr. covers all things Dora and Diego.  Hub is the home of My Little Pony, and our featured gal today.  If you don’t know the website for the character, just Google the character’s name.  I found my Strawberry printables here:  http://www.agkidzone.com/activities/

  There ARE printable party invitations available, but of course I can’t just print them off and go.  I have a crafty reputation to live up to!  I’ve got to make them more special than that.  After all, you only have a third birthday once.  I am also using an image from the printable Valentine’s cards I found on the website for the front of the invitation.  Take advantage of online printables for the kids in your life.  There are tons of free ones available (yes FREE!).  My daughter loves to watch something featuring Minnie or a favorite princess come out of the printer just for her to color or cut shapes with her safety scissors.  They also make a great addition to a kids goody bag (print a coloring or activity page on cardstock and roll it up treasure map style, tie them up with a theme coordinated ribbon, even attach a fun marker or small pack of crayons.)  Set lots of sheets out with boxes of crayons at a kids’ party for an easy activity station.   I promise these exist for just about any theme.
  The front of this card was made by trimming green cardstock to a greeting card size and attaching it to the card using a glue stick.  The pink decorative paper was trimmed to about half of the height of the card, I punched a hole in the corner using a strawberry shaped decorative punch, the layered the pink paper on top of the green so the green would peak out.  The middle border was done by layering two pre-made adhesive backed glitter tapes by recollections, a solid green, and a red flower pattern.  Remember the green from the Sweet Pea scrapbook layout?  Love this product!
 
  I printed my Strawberry Shortcake heart images on cardstock, so they would be more substantial than plain copy paper.  They were cut out to shape and also matted on green cardstock.  They were attached to the front of the card using foam adhesive to give them that extra little pop of dimension.  The phrase printed on the card I simply printed from a Microsoft word document in a coordinating color and font.  It was also matted on green cardstock and mounted on the card using the foam adhesive squares.
  The inside of the cards is the plain old printable invitation, printed on cardstock and adhered to the center of the card using a glue stick.
  I thought this card needed to feel special from the minute you got it, so I also did a couple things to cutesy up the envelope.  Again using the strawberry punch I punched a hole in the center of the flap and glue a small piece of pink decorative paper underneath so the color would peak out. 
 
I also added a flashy strip of the glitter roll tape.

How cute is that?!
Super cute and easy enough to make 10 cards and envelopes in a two short sittings!  Character printables do all the hard work in this card for me!  Thanks Strawberry!

Sunday, March 11, 2012

Glittering Part 2 - Think Tink.

This is another sneak peak of an easy peasy card that I will be teaching during a specialty class, “Martha Stewart Glittering Techniques.”  This class will be offered Sunday, April 15th from 2-4 p.m.  I have also just added a list of upcoming classes that I will be teaching to the side bar of this blog.  I will be keeping it updated regularly with my class info, for those of you who might like to come and craft with me in person.  (You should, it’s super fun!)
So here is the finished card.  I must say I LOVE the plaid border technique on this card.  It will definitely be showing up on projects in the future. 

I am again working out of the Martha Stewart Glittering Techniques Card kit.  The info on this kit is in my first post on glittering.  Here are my supplies:
  • Fine glitter in Orange Sherbet, and Tourmaline, a pretty pinky rose.
  • A chipboard butterfly.  This one’s pre-printed.
  • The glue tube included with the kit.
  • A peach cardstock pre folded blank card.
  • Double sided tape.  (This is the secret ingredient for perfect plaid.)
  • Foam adhesive spots, to make that butterfly pop.
  • A foam brush for spreading adhesive.
I used NO tools or supplies that were not included in the kit for this card, except for a plain piece of white printer paper to catch the glitter.
First I glittered the chipboard butterfly embellishment.  I did this first, so it would have a minute to dry.  After I set the butterfly on top of the printer paper, I squeezed a little glob of the glue from the tube onto the butterfly and the spread it with the foam brush until there was an even, thin coat.  Then I LIBERALLY applied the orange glitter.  Don’t be worried about using too much, you can’t.  Once you lift the butterfly and tap the back to release the excess onto the paper, just funnel the glitter back into the shaker using the paper. 

How pretty!  Set it aside for so it can dry.  Now for that awesome plaid corner border, it’s done in layers!  Working over the plain paper again, apply a strip of the double sided tap along the edge of the card, offset about a quarter of an inch from the edge.  Trim the ends flush.  Now rip off the second adhesive backing on the tape and apply the orange glitter to the line.  Tap off the excess and recapture it.  You end up with a perfectly striped glittered border.

The next layer is the pink horizontal stripe.  It’s double thick because it is two pieces of the double stick tape laid side by side.  Go ahead and lay it perpendicularly right over the orange border.  It won’t hurt it.  After you lay the two strips and remove the backing strip to expose the adhesive, glitter the line pink.  You can glitter right over the orange piece that intersects with the pink and they won’t mix, I promise.
Repeat the process again with the last orange line, offset about a quarter of an inch from the first orange glittered line.
Voila!  It looks complicated, but it’s so easy!  Now all you have to do is attach the chipboard butterfly that you glittered in the beginning using some foam adhesive pieces.  This is an impressive little card to put together in under 20 minutes. 
Don’t be afraid of glitter!  The mess factor can be intimidating, but a spill wipes up surprisingly easy.  Use wet wipes instead of a paper towel, and it just takes a second. 
Coming up next month is Easter, my daughter’s birthday, and my wedding anniversary.  Talk about a month full of crafty opportunities!  I can’t wait!                   

Tuesday, March 06, 2012

Roll one up! Making paper roses.

This past weekend at my store we had our open house event with all the instructors showing off thier crafty creations.  One of the classes I showcased was called FlowerWOW! It features this super easy flower making technique.  The variations and applications are basically endless.  Cut with decorative scissors to give a wavy edge.  Ink the edges of your petals for a dipped or faded look.  Distress the paper to look worn.  Add glue and glitter.  Cut out green paper leaves to accent.  Don’t be afraid to use pattered decorative papers, or use double sided paper for an even cooler look.
Here are the basic steps.   You probably have all the supplies needed to roll one right now!
  •  Scissors
  • A pencil
  • Adhesive – I actually use two different ones for this project, a glue stick and craft glue (I use Aleene’s Tacky Glue).  These both look white when applied but dry clear.    
  • A paper circle.  Obviously, the larger the circle the larger the flower.  I tried circles as large as 6 inches and as small as 2 ½ inches.  Pick any color or pattern you like!  I tried with both a lighter weight decorative paper and a medium weight cardstock, and got similar results with both. 
First, draw a spiral in your circle, like this:
Try to keep the width even throughout the spiral.  Then cut along the line you just drew.  If you are inking your edges go ahead and do so and let them dry for a couple minutes.
Start rolling the paper from the OUTSIDE end of the spiral.  Give it a couple practice rolls. 
Start the roll tight.  When you get to the end, if you want it tight keep your fingers held if you want you flower to be more open, release your fingers a bit and let the paper unroll some.  The inside of the spiral will look like a small flap.
Cover that with adhesive and press it to the base to seal the bottom of the flower.  I use the glue stick for this part.  Then I go back and reinforce the flower by slipping the tip of the tacky glue in between the petals and squeezing a little into the bottom center.  Then I press down the middle of the spiraled petals to adhere them.   
That’s it!  Now that you have a flower, make a couple more!
Now that you have a few flowers made, here are some ideas on what to do with them:  use one on a card or gift tag, mount them on a canvas painted in a contrasting color, make a dozen and attach them to stems and put them in a vase for a fun faux flower arrangement, make lots more and attach them with hot glue to a wreath.
Want to learn more fun, new techniques like this?  Come to my next Crop event.  It will be March 17, 2012 from 1-7 p.m.  As always the fee is only $5.00!!